← Quay lại danh sách ESP32 Nâng Cao
Khóa học:

Bài 1: ESP32 MQTT – Publish and Subscribe

🎯 Độ khó: Dễ ⏱️ Thời lượng: 45 phút 📘 Khóa: ESP32 Nâng Cao
💡 Tóm tắt bài học: This project shows how to use MQTT communication protocol with the ESP32 to publish messages and subscribe to topics. As an example, we’ll publish BME280 sensor readings to the Node-RED Dashboard, and control an ESP32 o...
📖 1. Lý Thuyết & Kiến Thức Nền Tảng

🔹 📖 Lý Thuyết & Kiến Thức Nền Tảng
Bài 1: ESP32 MQTT – Publish and Subscribe
📌 Bài 1: ESP32 MQTT – Publish and Subscribe
This project shows how to use MQTT communication protocol with the ESP32 to publish messages and subscribe to topics. As an example, we’ll publish BME280 sensor readings to the Node-RED Dashboard, and control an ESP32 output. The ESP32 we’ll be programmed using Arduino IDE.
Project Overview
In this example, there’s a Node-RED application that controls ESP32 outputs and receives sensor readings from the ESP32 using MQTT communication protocol. The Node-RED application is running on a Raspberry Pi.
We’ll use the
Mosquitto broker installed
on the same Raspberry Pi. The broker is responsible for receiving all messages, filtering the messages, decide who is interested in them and publishing the messages to all subscribed clients.
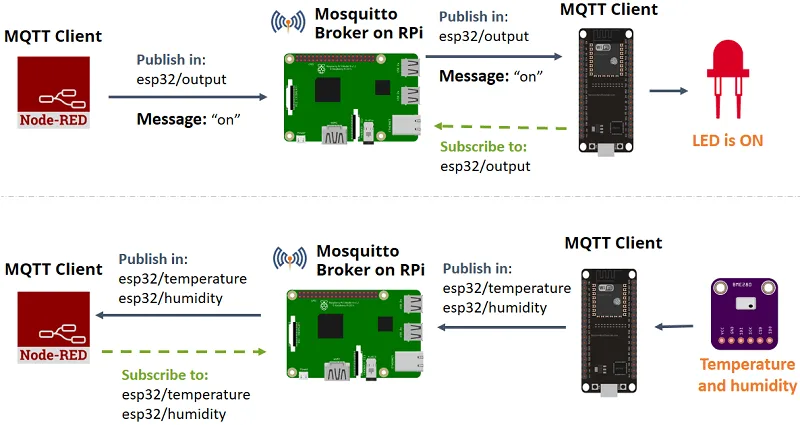
The following figure shows an overview of what we’re going to do in this tutorial.
The Node-RED application publishes messages (“
on
” or “
off
“) in the topic
esp32/output
. The ESP32 is subscribed to that topic. So, it receives the message with “on” or “off” to turn the LED on or off.
The ESP32 publishes temperature on the
esp32/temperature
topic and the humidity on the
esp32/humidity
topic. The Node-RED application is subscribed to those topics. So, it receives temperature and humidity readings that can be displayed on a chart or gauge, for example.
Note:
there’s also a similar tutorial on how to use the
ESP8266 and Node-RED with MQTT
.
Prerequisites
You should be familiar with the Raspberry Pi –
read Getting Started with Raspberry Pi
.
You should have the Raspbian operating system installed in your Raspberry Pi –
read Installing Raspbian Lite, Enabling and Connecting with SSH
.
You need
Node-RED installed on your Pi
and
Node-RED Dashboard
.
Learn
what’s MQTT and how it works
.
If you like home automation and you want to learn more about Node-RED, Raspberry Pi, ESP8266 and Arduino, we recommend trying our course:
Build a Home Automation System with Node-RED, ESP8266 and Arduino
. We also have a course dedicated to the ESP32: Enroll in
Learn ESP32 with Arduino IDE
course.
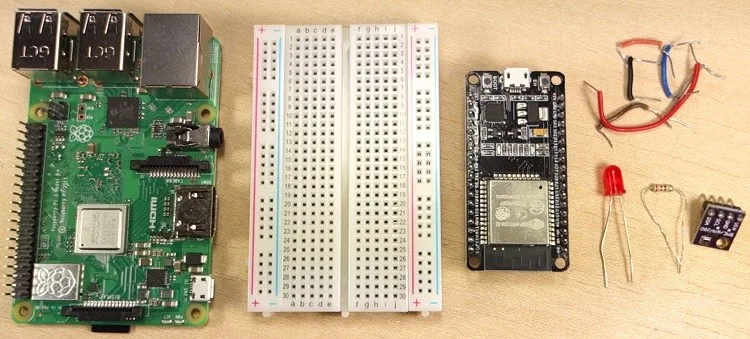
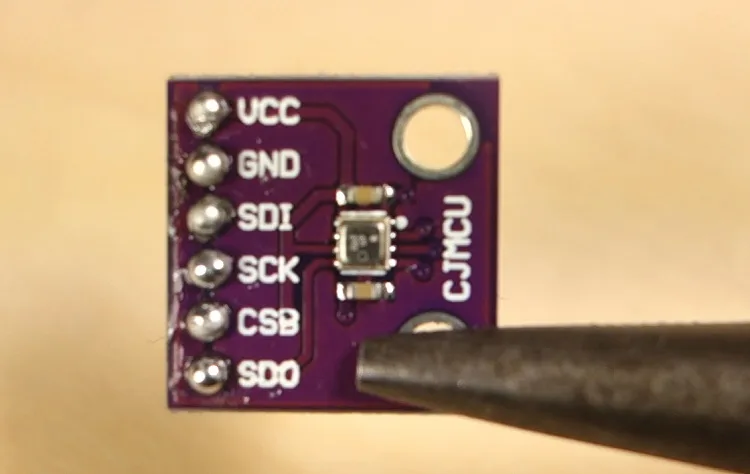
Parts Required
These are the parts required to build the circuit (click the links below to find the best price at
Maker Advisor
):
Raspberry Pi
–
🔌 2. Sơ Đồ Đấu Dây & Linh Kiện

🔹 🔌 Sơ Đồ Đấu Nối & Linh Kiện

Linh KiệnChân ESP32Ghi Chú
Bo mạch ESP32 Development BoardCổng USB Micro / Type-CCấp nguồn 5V & nạp code
Linh kiện cảm biến / ModuleCác chân GPIO tương ứngCấp nguồn 3.3V và GND
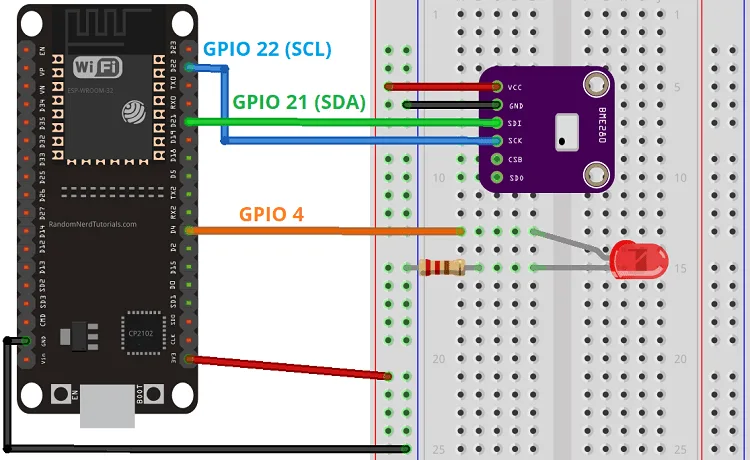
Sơ đồ cắm dây Bài 1: ESP32 MQTT – Publish and Subscribe
📌 Sơ đồ cắm dây Bài 1: ESP32 MQTT – Publish and Subscribe
💻 3. Chương Trình Mã Nguồn C++ Arduino / ESP32
⚡ Arduino C++ (ESP32)
#include <WiFi.h>
#include <PubSubClient.h>
#include <Wire.h>
#include <Adafruit_BME280.h>
#include <Adafruit_Sensor.h>

// Replace the next variables with your SSID/Password combination
const char* ssid = "REPLACE_WITH_YOUR_SSID";
const char* password = "REPLACE_WITH_YOUR_PASSWORD";

// Add your MQTT Broker IP address, example:
//const char* mqtt_server = "192.168.1.144";
const char* mqtt_server = "YOUR_MQTT_BROKER_IP_ADDRESS";

WiFiClient espClient;
PubSubClient client(espClient);
long lastMsg = 0;
char msg[50];
int value = 0;

//uncomment the following lines if you're using SPI
/*#include <SPI.h>
#define BME_SCK 18
#define BME_MISO 19
#define BME_MOSI 23
#define BME_CS 5*/

Adafruit_BME280 bme; // I2C
//Adafruit_BME280 bme(BME_CS); // hardware SPI
//Adafruit_BME280 bme(BME_CS, BME_MOSI, BME_MISO, BME_SCK); // software SPI
float temperature = 0;
float humidity = 0;

// LED Pin
const int ledPin = 4;

void setup() {
  Serial.begin(115200);
  // default settings
  // (you can also pass in a Wire library object like &Wire2)
  //status = bme.begin();  
  if (!bme.begin(0x76)) {
    Serial.println("Could not find a valid BME280 sensor, check wiring!");
    while (1);
  }
  setup_wifi();
  client.setServer(mqtt_server, 1883);
  client.setCallback(callback);

  pinMode(ledPin, OUTPUT);
}

void setup_wifi() {
  delay(10);
  // We start by connecting to a WiFi network
  Serial.println();
  Serial.print("Connecting to ");
  Serial.println(ssid);

  WiFi.begin(ssid, password);

  while (WiFi.status() != WL_CONNECTED) {
    delay(500);
    Serial.print(".");
  }

  Serial.println("");
  Serial.println("WiFi connected");
  Serial.println("IP address: ");
  Serial.println(WiFi.localIP());
}

void callback(char* topic, byte* message, unsigned int length) {
  Serial.print("Message arrived on topic: ");
  Serial.print(topic);
  Serial.print(". Message: ");
  String messageTemp;
  
  for (int i = 0; i < length; i++) {
    Serial.print((char)message[i]);
    messageTemp += (char)message[i];
  }
  Serial.println();

  // Feel free to add more if statements to control more GPIOs with MQTT

  // If a message is received on the topic esp32/output, you check if the message is either "on" or "off". 
  // Changes the output state according to the message
  if (String(topic) == "esp32/output") {
    Serial.print("Changing output to ");
    if(messageTemp == "on"){
      Serial.println("on");
      digitalWrite(ledPin, HIGH);
    }
    else if(messageTemp == "off"){
      Serial.println("off");
      digitalWrite(ledPin, LOW);
    }
  }
}

void reconnect() {
  // Loop until we're reconnected
  while (!client.connected()) {
    Serial.print("Attempting MQTT connection...");
    // Attempt to connect
    if (client.connect("ESP8266Client")) {
      Serial.println("connected");
      // Subscribe
      client.subscribe("esp32/output");
    } else {
      Serial.print("failed, rc=");
      Serial.print(client.state());
      Serial.println(" try again in 5 seconds");
      // Wait 5 seconds before retrying
      delay(5000);
    }
  }
}
void loop() {
  if (!client.connected()) {
    reconnect();
  }
📝 4. Giải Thích Thuật Toán & Mã Nguồn C++

🔹 📝 Giải Thích Mã Nguồn C++

▪Khai báo các thư viện chuẩn của vi điều khiển ESP32.
▪Hàm setup() khởi tạo cổng Serial Monitor tốc độ baud 115200 và cấu hình chân GPIO.
▪Hàm loop() thực thi thuật toán điều khiển và xử lý tín hiệu theo thời gian thực.
🚀 5. Thử Nghiệm Vận Hành & Khắc Phục Lỗi (Troubleshooting)

🔹 🚀 Thử Nghiệm & Kết Quả Vận Hành

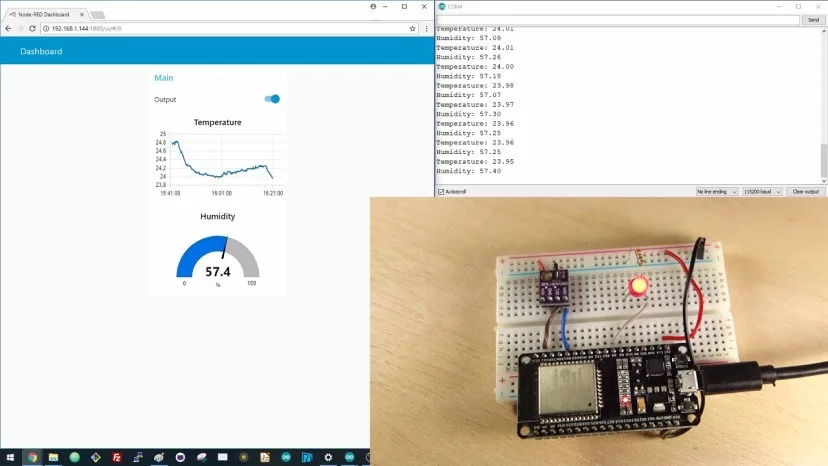
Kết quả vận hành Bài 1: ESP32 MQTT – Publish and Subscribe
📌 Kết quả vận hành Bài 1: ESP32 MQTT – Publish and Subscribe
Kết quả vận hành Bài 1: ESP32 MQTT – Publish and Subscribe
📌 Kết quả vận hành Bài 1: ESP32 MQTT – Publish and Subscribe
Kết quả vận hành Bài 1: ESP32 MQTT – Publish and Subscribe
📌 Kết quả vận hành Bài 1: ESP32 MQTT – Publish and Subscribe